
Today’s lesson is all about having fun with chemistry!
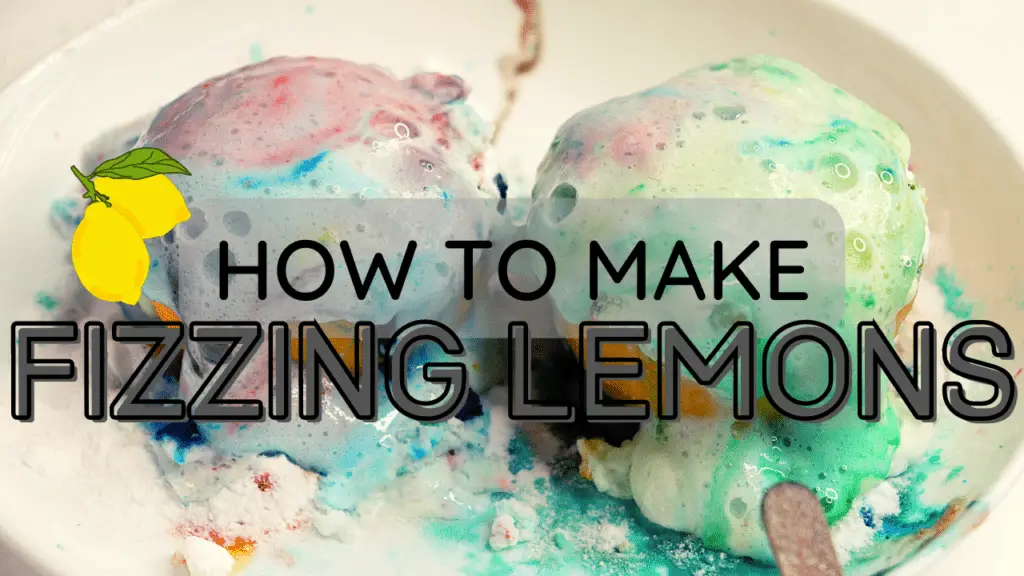
The Fizzing Lemon experiment allows you to see the chemical reaction when an acid (lemon juice) comes into contact with a base (baking soda). It allows your child to see what happens in a chemical reaction while creating an exciting lemon volcano.
Teaching the chemistry behind the Fizzing Lemons experiment is easier than you would think! Days after the experiment, my 3-year-old is still telling me that baking soda is a base and lemon juice is an acid.
How to make the Fizzing Lemon experiment
Supplies you will need
For the Fizzing Lemon experiment, you’ll need:
- Lemons
- Baking soda
- Food coloring
- Craft sticks (if you don’t have them, a fork or extra spoon would work)
- Spoon
- Optional: dish soap (for more bubbling during the reaction)
If you don’t have lemons on hand but do have vinegar, you could try out this fizzing paint experiment.

Before you start
This experiment is MESSY, so I recommend doing this in a shallow bowl or on a plate. A towel under the experiment would be good too since you will need a spot for your craft sticks/spoons in between reactions.
Instructions
Here is how to do the Fizzing Lemon experiment:
Step 1: Roll the lemon

Don’t skip this step! It will help you get more out of your chemical reaction by rolling your lemon.
Rolling the lemon breaks up the juices in the pulp of the lemon, allowing more of the juice to be used in the experiment.
Press down on your lemon while rolling it on a table a few times and that should do the trick.
Get your child involved: let them have a turn to roll the lemon and explain why we’re doing it!
Step 2: Cut the lemon
In addition to cutting the lemon in half, I also cut the ends off each side of the lemon to help it sit straight up in our bowl.


Step 3: Add in your food coloring (and optional dish soap)
Dish soap allows your chemical reaction to also get bubbly. If you’re going to add it, add it just before your food coloring.


We did the experiment with and without the dish soap. Let’s see what the difference was in our chemical reactions!
WITH dish soap:

WITHOUT dish soap:

As you can see, adding the dish soap gives our reaction a thicker, milkier reaction. It’s completely optional to add dish soap since it’s not needed to see a reaction, but it certainly does give more of an effect.
Get your child involved: let them pick out the colors for each lemon. Ask which colors they want to mix and what color they think the fizz and foam will become once you do the experiment.
Step 4: Add the base (baking soda)

Use a clean spoon to add baking soda on top of each lemon. We added quite a bit: we had a heaping pile of baking soda on each lemon.
Step 5: Start the reaction

If you have a craft stick on hand, use the stick to start stabbing into your lemon to bring the lemon juice to the baking soda. Be sure to have a hand on your lemon so it doesn’t tip over while you are using the craft stick.
If you don’t have a craft stick, you can easily use another spoon or a fork to get the same effect.
Get your child involved: allow them to have their own craft stick! Hold the lemon for them as they stab the lemon with their stick and start the chemical reaction.
If you enjoyed watching lemons fizz up, you may also like this fizzing paint experiment, or even create your own homemade lava lamp with another acid-base reaction!
The science behind the Fizzing Lemon science experiment
The Fizzing Lemon experiment is a great experiment to learn about chemistry!
For the parent
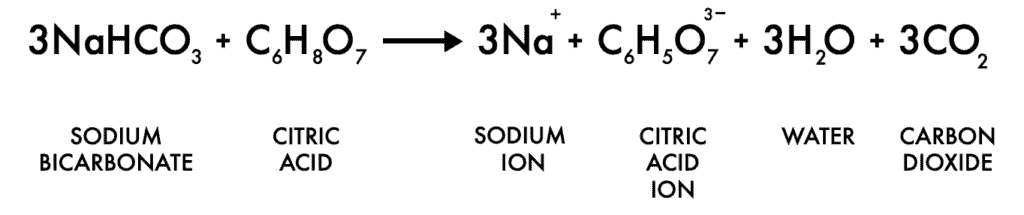
The juice in the lemon is made of citric acid. When you mix that acid with a base (baking soda), it forms carbon dioxide and sodium citrate.
As the chemical reaction forming carbon dioxide gas is created, fizzing foam starts to erupt from our lemon.
The dish soap adds a deeper effect by making the reaction milkier and thicker, causing a bigger reaction!
If you want to take your knowledge of the chemical reaction in the fizzing lemon experiment to the next level, here is the chemical equation for what is going on in the Fizzing Lemons experiment:
For the child
When we see our lemon fizzing and foaming, we are seeing what it looks like to combine two things that react to each other. That reaction is called a chemical reaction!
The two things that we are combining to cause the fizzing you see are the juice of the lemon (citric acid) and our baking soda. When these two things are combined, we see fizzing and foaming because these two substances make a new substance.
FAQ about the Fizzing Lemon Experiment
Can I do the Fizzing Lemons experiment with any citrus fruit?
Yes! We had a lot of fun trying this same experiment with grapefruit and lime. I asked my preschooler if she thought grapefruit and lime were also acids and then we tested her hypotheses.
As it turned out, the grapefruit didn’t have as pronounced of a reaction and the lime ended up bubbling quite a bit!
See our video above near the end to check out the reactions.
What does the dish soap do?
You don’t necessarily need the dish soap to do this experiment, which is why I did not include it in the list of supplies you would need to do Fizzing Lemons.
The dish soap gives the reaction a milkier, thicker foam as opposed to a more watery fizz with no dish soap. I liked the look of the reaction with the dish soap, but it all depends on what you have on hand.
Related experiments
Fizz, Pop, Inflate: The magical balloon experiment with a chemical reaction
Chemical reactions happen all around us, sometimes without even knowing it. From baking a loaf of bread in the kitchen to rust forming on a metal surface outside, chemical reactions are happening...
The Rev Up engineering experiment is so great because it combines engineering with science while keeping your child engaged in the excitement! This experiment involves science and engineering by...